Heroku is a cloud platform as a service used to deploy, manage, and scale your applications. It supports several programming languages and has a very simple and convenient deployment settings.
Most of the time while we develop spring based applications , we have to deploy and host in live running servers . But most of the time java based hosting are costlier and not meant for development . To solve this bottleneck most of the Cloud service providers provide a free tier to host applications , Heroku is one of them .
Heroku is a PAAS cloud service provider which provides support for multiple programming languages to host your applications for free.
One of the biggest advantage of deploying applications on Heroku cloud is it takes care of all the hassle of complex deployment process , infrastructure and scaling up your apps with multiple layers of security inbuilt .
Create a Simple Spring Boot Application for Heroku
Let’s go ahead and create a simple spring boot application using spring initializr. Please follow the steps to create a simple spring boot app.
- Enter Group name as
com.frugalis - Enter artifact id as
SpringHeroku. - Click on Generate and import in your favorite IDE.
Now let’s go ahead and write a simple controller as below, we are now ready with a simple app to deploy spring boot app on Heroku.
Create Demo End Point In Order to Access from Heroku
We are going to create a simple Spring boot Controller in our spring boot project, so that we can just access the end point and test our deployment on Heroku .
package com.frugalis;

import org.springframework.web.bind.annotation.GetMapping;
import org.springframework.web.bind.annotation.RestController;

@RestController
public class HomeController{
    @GetMapping("/")
    public String index() {
        return "Welcome to frugalis Heroku demo !!";
    }
}
Please have a look at one of our blog post to Create Rest Services Using Spring Boot.
Deployment On Heroku Using Heroku-CLI and Git
First of all, you need to login to Heroku account and navigate to Heroku dashboard . In case you don’t have one, you can create it from Heroku’s Signup Page. We are going to use Heroku CLI and Git. Let’s follow the steps now to deploy.
1.1 Download And Install Heroku CLI
Heroku CLI is a command line tool that helps to manage Heroku apps using the terminal. Please Download Heroku CLI and follow the instructions to install it on your computer.
1.2 Create Heroku App
Navigate to your Heroku dashboard by using the Dashboard link. Click on New button on right most corner and click on Create New App button.
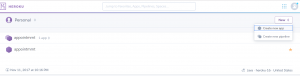
You will get something like this below,
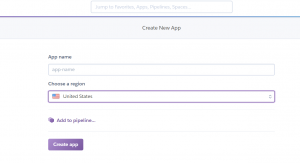
Please enter the app name and click on create an app. Please note down the app name you entered. It will take you to Heroku app and the app page looks like below.

1.3 Login to Heroku CLI:-
We are going to login to Heroku using Heroku CLI .If you haven’t already, log in to your Heroku account. Please open command prompt/terminal and enter the following command.
$ heroku loginYou will be prompted to enter your Heroku account’s credentials either a page asking for Heroku Credentials will open or a prompt will open up asking for Id and password like below.
Enter your Heroku credentials:
Email: xyz@abcd.com
Password: *********
Logged in as xyz@abcd.com
1.4 Deploy Spring Boot App On Heroku using Heroku Git:-
Please navigate to your Spring Boot project and execute the following list of commands sequentially.

We have now deployed our app on Heroku. Here frugalisapp is the app name. You can get these commands in app page under deploy section. You can open deployed app using Heroku by executing the command .
$ heroku open
Have a look at different want to run and deploy spring boot applications.
Deploy Spring Boot App Using Jar File:-
Before going on to the details, Let’s look at few of the important plugins and install those . We are going to deal with two plugins Heroku Repo and Heroku CLI Deploy respectively.
Let’s clean the cache and reset the app using Heroku repo.
$ heroku plugins:install heroku-repo
$ heroku repo:gc -a appname
$ heroku repo:reset -a appname
Now let’s deploy our Spring Boot project using Heroku CLI Deploy plugin.
Open application.properties from src/main/java/resources/application.properties.
Please add following line below.
server.port=${PORT:8080}
Navigate to Spring project folder and run.
$mvn clean package
Now run deploy command from your project directory.
$ heroku deploy:jar target/SpringHeroku-0.0.1-SNAPSHOT.jar --app <APP-NAME>
Deploy Spring Boot App On Heroku Using Procfile
We are going to add a Procfile in our spring boot app like below . One of the biggest advantage of using a procfile in heroku is that it lets you customize and override the default configurations that we do in our application.properties .
It is useful in cases where you have maven multi module spring boot app and your main jar is placed under one of the modules .
Heroku Procfile lets you run your own custom commands , lets say you have a multi module spring boot application in that case you can specify the module from where your spring boot jar should run and specify the command in Procfile .
web: java -Dserver.port=$PORT $JAVA_OPTS -jar target/*.jar
Now execute the deploy plugin again as below:-
$ heroku deploy:jar target/SpringHeroku-0.0.1-SNAPSHOT.jar --app <APP-NAME>
How to Verify Logs of Deployed Spring boot application In Heroku
Once you have deployed your application , now we should be verifying if my application has started successfully or not . In that case you can use heroku CLI to view logs
heroku logs --tailThis command is similar to what we use in Linux as ” tail -f ” . You can also verify application build log like shown below .

Drop us an Email With Subject “Help On Spring Boot heroku ” if you want our team to help you on deploying any Spring boot App on heroku !! Free !!!!!!
Have a Look at Complete Video with Step by Step Guide
CRUD Rest API With Spring Web-Flux Reactive Programming with Spring 5
Creating REST Service with Spring Boot
CRUD Rest Service With Spring Boot and JPA
Spring Boot Profiling – Configure for Different Environments