We all see a banner that shows in Spring Boot application once it starts up. Do you know this banner can be customized? How to add Spring Boot Custom Banner?. If you are not aware of these answers then this post is a good read for you. You will learn adding custom Spring boot banner.
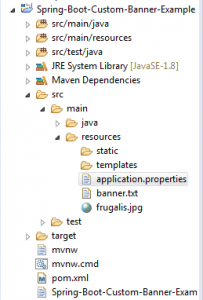
In order to add the Spring Boot Custom banner of your Spring boot application, you can create either a banner.txt or banner image (png/gif/jpg) file and put it inside src/main/resources.Let us go ahead and check how can we do.
Create a Text Banner :-
We generally get the default spring banner with Spring printed , but we now want something like below .

- Visit the link here .
- Type your banner text
- Select a Banner Font
- Select the text Shown below.
- Create a file named
banner.txtinsidesrc/main/resources - Copy the generated text and Paste in the file
banner.txt.

Project Structure:-

Configure Custom Banner Location
We can also add Spring Boot Custom Banner as image .We are going to configure our Spring boot Custom Banner text location in application.properties.We can configure banner.location property that is used to configure banner file location.
banner.location = custombanner.txt
We must put our custombanner.txt file in classpath under resources folder.So that Spring will pickup that file and load banner from that file.
Lets see how to add Spring Boot Custom banner as Image .Spring Boot Application provdes a way to load bannner images as well during application startup.If we want to load a banner image by default we need to put a file named as banner.jpg,banner.png or banner.gif in our resources folder and spring Boot will pickup that file on startup .
We can also customize location of banner image file as below, if we provide our own image location we can put file with any name .
banner.image.location = custombanner.jpg
Customize Color and Adding Custom Banner Variables :-
We can Customize text color in Banner as well as use some variables from property file and show in Banner as follows. In order to enable colors we need to add a property in application.properties as below .This enables ANSI in our console.
spring.output.ansi.enabled=always${Ansi.YELLOW}***********************************************************************************************************************
${Ansi.RED} _____ _ _
${Ansi.RED} | ___| _ __ _ _ __ _ __ _ | | (_) ___
${Ansi.RED} | |_ | '__| | | | | / _` | / _` | | | | | / __|
${Ansi.RED} | _| | | | |_| | | (_| | | (_| | | | | | \__ \
${Ansi.RED} |_| |_| \__,_| \__, | \__,_| |_| |_| |___/
${Ansi.RED} |___/
${Ansi.GREEN}Application : ${application.name}
${Ansi.GREEN}Application Version : ${application.formatted-version}
${Ansi.GREEN}Application Title : ${application.title}
${Ansi.GREEN}Spring Boot Version : ${spring-boot.version}
${Ansi.GREEN}Spring Boot Formatted Version : ${spring-boot.formatted-version}
${Ansi.YELLOW}***********************************************************************************************************************We are using ${application.name}, in our banner.txt this reads the value of the variable from property file and replace with value in banner. Now Open your bash window and run mvn clean install.


