Enable Authentication in MongoDB
Most RDBMS like MySQL, Oracle, SQLServer comes with inbuilt authentication setup with simple authentication. MongoDB has a different feature, it doesn’t comes with inbuilt basic authentication setup.There is no restriction to the MongoDB database inbuilt, any user can access any database.In this blog post, we are going to see how we can setup user authentication to our mongo database server and schema level.
Our Requirement:-
- We are going to authenticate database connection with an Admin User.
- We are going to create a User which as Owner permission to the specific database in MongoDb
Step 1: Connect MongoDb Without Authentication
We don’t have any authentication set in our mongo server so we can login by typing following command
$ mongo mongodb://<host>:<port>
Our host is 127.0.0.1 in case we are in local machine and port by default is 27017 .Now lets enable authentication in mongodb .
Step 2: Create an admin User
Open your Mongo shell and enter the command below to Switch to admin database .
First of all, you need to create an administrator user. I prefer creating super user.
> use admin
Now We need to create a user which has root access to the database . Provides access to the operations and all the resources ofreadWriteAnyDatabase,dbAdminAnyDatabaseuserAdminAnyDatabase clusterAdminroles, restoreand rolesbackup combined.
This user has all access to do any operation on any other databases including admin database.
> db.createUser({user:"admin",
                 pwd:"admin",
                roles:[{role:"root",
                         db:"admin"
                        }] });
Step 3: Configuring Mongod authentication
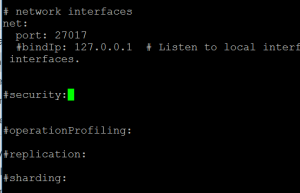
Open a file mongod.conf located under etc using any editor of your choice.
$ sudo vi /etc/mongod.conf
You will see something like this:-

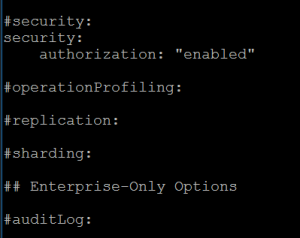
security:
    authorization: "enabled"
Locate #security and add the following line just below of that, save and exit from your editor . Your updated file should look like the image below.

Step 4 : Restart MongoDB Service
$ sudo service mongod restart
Step 5 : Connect to Mongo and Authenticate admin User
Let’s connect to mongo shell and execute following commands to test the user we have just created.
$mongo
MongoDB shell version: 3.0.15
connecting to: test

> use admin
You will get some error saying:-
> show collections
2018-02-26T10:54:40.800-0500 E QUERY    Error: listCollections failed: {
        "ok" : 0,
        "errmsg" : "not authorized on admin to execute command { listCollections: 1.0 }",
        "code" : 13
}
    at Error (<anonymous>)
    at DB._getCollectionInfosCommand (src/mongo/shell/db.js:646:15)
    at DB.getCollectionInfos (src/mongo/shell/db.js:658:20)
    at DB.getCollectionNames (src/mongo/shell/db.js:669:17)
    at shellHelper.show (src/mongo/shell/utils.js:625:12)
    at shellHelper (src/mongo/shell/utils.js:524:36)
    at (shellhelp2):1:1 at src/mongo/shell/db.js:646
It says you are not authorized to view collections inside admin database hence you need to authenticate yourself. This shows that your database has enabled authentication in MongoDB.
Let’s authenticate with the user we created .
> db.auth("admin","admin")
1
> db.getUsers();
[
        {
                "_id" : "admin.admin",
                "user" : "admin",
                "db" : "admin",
                "roles" : [
                        {
                                "role" : "root",
                                "db" : "admin"
                        }
                ]
        }
]
>
We must get the output of db.auth() as 1.Now you have successfully enable authentication in MongoDB.
Let’s Create a database and create a Separate User for the database and try to enable authentication in MongoDB for that database.
Step 6 :Create Database, User and Enable Authentication for Specific Database
We are going to create a user with a role as DbOwner for the database named as testMongo.
>use testMongo
switched to db testMongo

> db.createUser(
  {
    user: "testMongoAdmin",
    pwd: "testMongoAdmin",
    roles: [ { role: "dbOwner", db: "testMongo" } ]
  })
Now you don’t need to log in as admin in every database.We can use database specific users to access database and use admin user to manage all databases.


