Spring MVC Setup and Hello World:-
In this tutorial, we will show you a Spring MVC, Hello World Example and do a basic Setup Using Eclipse . Spring MVC Container is an extended version of IOC container. We are going to setup a simple Spring MVC example using maven.
There are number of ways with which we can setup , but i am showing most basic one .
Technologies used :-
- Spring
- Eclipse 4.4
- JDK 1.7
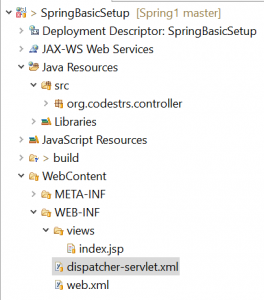
1. Project Structure

2. Spring MVC
2.1 Download Spring Related Jars From here
2.2 Create Your web.xml accordingly .
<?xml version="1.0" encoding="UTF-8"?>
<web-app xmlns:xsi="http://www.w3.org/2001/XMLSchema-instance" xmlns="http://java.sun.com/xml/ns/javaee" xsi:schemaLocation="http://java.sun.com/xml/ns/javaee http://java.sun.com/xml/ns/javaee/web-app_2_5.xsd" id="WebApp_ID" version="2.5">
  <display-name>SpringBasicSetup</display-name>
  <servlet>
        <servlet-name>dispatcher</servlet-name>
        <servlet-class>org.springframework.web.servlet.DispatcherServlet</servlet-class>
      <load-on-startup>1</load-on-startup>
    </servlet>
    <servlet-mapping>
        <servlet-name>dispatcher</servlet-name>
        <url-pattern>/</url-pattern>
    </servlet-mapping>
</web-app>
2.3 Create Dispatcher Configurations:-
We need to create a file named dispatcher-servlet.xml in web-inf Folder and create a Folder named as views, where all your JSP files will reside.
For Views or JSP we need to configure ViewResolver as well.
<beans xmlns="http://www.springframework.org/schema/beans"
    xmlns:mvc="http://www.springframework.org/schema/mvc"
    xmlns:context="http://www.springframework.org/schema/context"
    xmlns:xsi="http://www.w3.org/2001/XMLSchema-instance"
    xsi:schemaLocation="
        http://www.springframework.org/schema/beans
        http://www.springframework.org/schema/beans/spring-beans-3.0.xsd
        http://www.springframework.org/schema/mvc
        http://www.springframework.org/schema/mvc/spring-mvc-3.0.xsd
        http://www.springframework.org/schema/context
        http://www.springframework.org/schema/context/spring-context-3.0.xsd">
    <context:component-scan base-package="org.codestrs.controller" />
    <bean
        class="org.springframework.web.servlet.view.InternalResourceViewResolver">
        <property name="prefix">
            <value>/WEB-INF/views/</value>
        </property>
        <property name="suffix">
            <value>.jsp</value>
        </property>
    </bean>
    <mvc:resources mapping="/resources/**" location="/resources/" />
    <mvc:annotation-driven />

</beans>
In the above configurationdispatcher-servlet.xml file, we have defined a tag.<context:component-scan> This will allow Spring to load all the components from the package org.codestrs.controller and all its child packages.
This loads.BaseAnnotated.class Also, we have defined a bean viewResolver. This bean will resolve the view and add prefix string,/WEB-INF/views/ and suffix .jsp to the view in ModelAndView. Note that in our BaseAnnotatedclass, we have return a ModelAndView object with view name welcome. This will be resolved to path /WEB-INF/jsp/index.jsp .
2.4 Create Controller
package org.codestrs.controller;

import org.springframework.stereotype.Controller;
import org.springframework.web.bind.annotation.RequestMapping;
import org.springframework.web.servlet.ModelAndView;


@Controller
public class BaseAnnotated {

	@RequestMapping("/")
	public ModelAndView getmainPage(){
		ModelAndView mv=new ModelAndView("index");
		mv.addObject("msg","Annotated Controller");
		return mv;
	}
}
That’s All , You have Configured your basic Spring Boot Application . Watch Video for more eclipse settings if you have any queries.Spring mvc setup will clear your basic knowledge. If you want to make your concepts regarding spring mvc setup there is a very good book on Spring MVC 4 , You can learn basics of MVC , though we do using java Config but it has very much explanation using xml approach .XM approach will make your concepts clear .
Please Comment Like Share and Subscribe !


